
Unlike running your website on a DIY platform such as Squarespace, Wix or even WordPress.com, a private WordPress installation requires some manual maintenance to ensure that the site continues to function as expected and that you are protected from any security vulnerabilities.
This advice also applies if you are using a managed WordPress hosting solution such as Hostinger or WP Engine, because while those hosting providers can help you manage the update process, they do not have insight into every little customization that you, or a developer you have hired, may have implemented on the site.
In this article, I’ll go over my best practices for keeping a WordPress site up to date, as well as providing a detailed step-by-step guide on how to do it. In addition, I’ll also provide a few additional tips that can help improve the overall health of your website, whether you are on WordPress or not.
What Does Maintaining A WordPress Website Involve?
To maintain a WordPress website, you’ll need to make sure any plugins and themes you are running are up to date, as well as making sure your WordPress installation is running the latest stable public release. Taking care of both these aspects ensures that you have access to all the latest features the core WordPress software, and your installed plugins have to offer. These updates will also protect you from any security vulnerabilities, which can often happen when hackers exploit a weakness in an outdated plugin, theme, or WordPress version.
On the hosting side, you’ll need to make sure you upgrade and test new PHP versions when they are released. Don’t worry if that sounds complicated, a lot of managed hosting providers can help you with that part.
Finally, you’ll also want to audit your site from time to time, to make sure you don’t have any broken links or imagery within your content, to make sure you don’t have anything that is slowing your site down for users, and that you are meeting the latest industry standards when it comes to accessibility and technical search engine optimization. While these last few items are not necessary to keep your WordPress site functioning correctly, they will help you greatly when it comes to user experience and search engine discoverability.
How Often Do I Need To Maintain My WordPress Site?
At On Press, we recommend carving out 1 day a month to focus on updating your WordPress website.
Do I have to be a developer to update my WordPress site?
You do not have to be a developer to run updates on your WordPress website. The steps I will provide in this article can be accomplished by any non-technical member of your team. However, it is sometimes common to encounter an issue when you are updating a plugin that can break things on your website. If you encounter this scenario, I have provided details in this article on how you can revert those changes to a working version, but it is at this point that you may need the help of a developer to fix the issue you encountered so you can eventually have everything up to date.
WordPress Site Maintenance – Step-by-Step Guide
- Before you get started
- Notify your team
- Sync all content and data to a staging site
- Write a test plan document
- Run a security scan
- Update the WordPress version
- Update your WordPress theme
- Update each plugin individually
- Evaluate your updates
- Delete deactivated plugins
- Delete deactivated themes
- Backup your live/production WordPress website
- Run through all updates on your live/production site
- Find and fix broken links and images
- Run an accessibility test
- Run a technical SEO test
- Run a site speed test
- A note about PHP updates
- A note about managed WordPress hosting providers
1. Before you get started
If you have just reviewed the list of steps involved above, you may be thinking that this all seems a bit long and complicated. Let me reassure you, that if you have a fairly simple website, you should be able to breeze through the update process pretty effortlessly. If you have a site that depends on a lot of plugins and custom development, the process may be longer and more involved. My goal with this article is to cover every base so you are fully informed no matter the size and complexity of your WordPress website.
Before you begin any updates on your WordPress site, I have a few recommendations that will keep you organized throughout the process…
Firstly I want to make it clear that you should never run any updates on your live/production website without testing them on a staging site first. The last thing you want to happen is for your site to go down and be inaccessible to users.
Secondly, I recommend taking notes as you are going through the update process. This can be very helpful if you encounter a problem while updating a specific plugin. You’ll be able to write down what went wrong and what action you took before the problem occurred. This information will be invaluable for you or a developer later down the road if you need to fix anything. I like to use a tool like Evernote or Notion for my note-taking, so I can easily search for the details of my notes later.
In summary, proceeding methodically, step by step, through the update process will allow you to instantly pinpoint the cause of any problem you encounter. If you update things on mass, all at once, you’ll have no idea what would be the cause of any site error you may encounter.
2. Notify your team
If you run a site that has multiple WordPress authors, editors, and admins each contributing content to the site on their own timelines, I recommend you send all these team members an email to notify them that the site will be going through an update and that they should not log in to WordPress during this update period. You can call this a “blackout window” or “content freeze”. This will make sure that you don’t overwrite any new content that has been added while you are updating the site.
3. Sync all content and data to a staging site
Before running any updates, you should sync your entire WordPress website to a separate staging website. You will then conduct all your updates and tests on this staging site to make sure everything goes according to plan before eventually running the same updates on your live/production website. This allows you to safely test things out without bringing your live site crashing down for any reason.
If you don’t have a staging website set up, you can follow my guide here on How to set up a WordPress staging site. In that guide, I also show you how to copy and sync data from your live WordPress site to your staging WordPress site.
The most important factor is that you make sure your staging site is an exact copy of your live website. This includes everything from your WordPress software version to your themes, plugins, settings, and content, including all media files. You also want to make sure that the hosting environment for your staging site is exactly the same as your live production site. There have been many times when I have seen everything go fine on a staging site only to encounter errors later on a live site, the problem being a discrepancy between a server setting, for example… a different PHP version. It is for this reason that I also recommend running your tests and updates on an actual server rather than doing it locally on your computer.
4. Write a test plan document
Before you start updating anything on your website, I believe it is very important to take a moment to think about what are the most important pages, features, and functions on your website. If you have a simple website with only a few pages of content, then you won’t have to worry about this as much. If you have a large website with hundreds or thousands of pages, plus a lot of plugins powering different features and functions, then you will definitely want to create a test plan document.
The test plan document is basically a checklist of tests you will run through, one by one after you make an update to a plugin or WordPress version. This allows you to make sure you test the most important functions on your website and discover any errors or problems that a plugin update may have introduced to your website.
To create a test plan document, you can simply make a bullet point list of each test you want to perform. Just make sure that you list these tests in order of priority or in order of the intended functionality.
For example, some tests for an e-commerce site would look like this:
- Add product to cart
- Go to checkout
- Pay with test credit card details
- Review the order confirmation page
You may also want to test WordPress core features, like publishing posts and pages, or any plugin specific functionality.
5. Run a security scan
To prepare ourselves for the update process, I like to start with doing a little house cleaning, and one important part of this is to do a full security scan on your site to discover any threats or malware. Unfortunately, no WordPress site is immune to hacking attempts, but there are many tools out there that can help us combat it.
The easiest way to run a security scan is to install the Wordfence Security plugin. It’s one of the most popular and widely respected plugins of its type. You can install their plugin and follow their prompts and documentation to run your scan.
6. Update the WordPress version
Now for the updates! I recommend updating your version of the core WordPress software before updating any plugins. The latest version of your plugins should be tested to work with the latest WordPress version, so you will be less likely to run into problems if you have the latest version of WordPress installed on your site.
Here’s how to update your WordPress version.
- Login to the WordPress admin for your staging site, making sure your WordPress user account is an “Administrator” account.
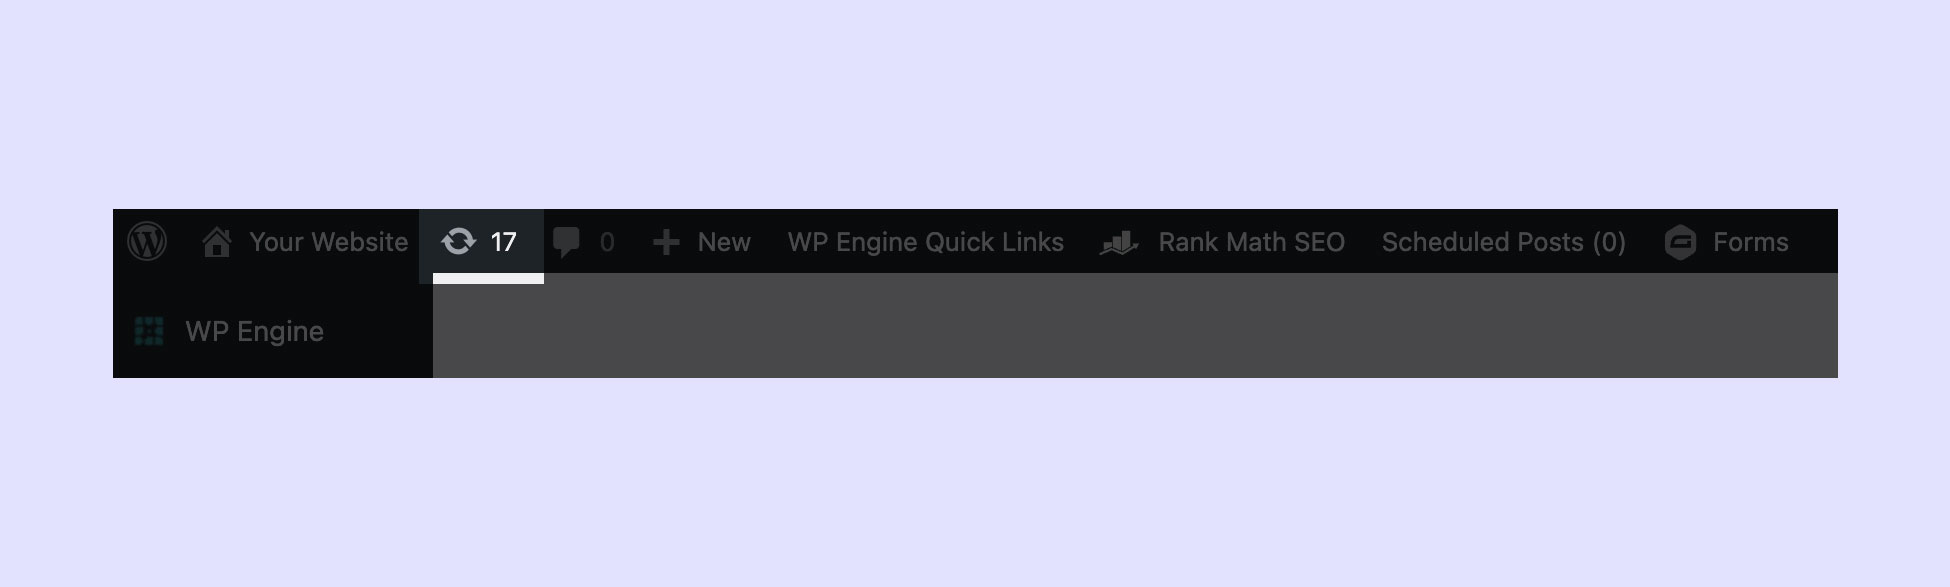
- Once logged in, In the top toolbar, look for the update icon (pictured below) and click on it. The next page that loads will be the WordPress updates page. This page will tell you if there is a new WordPress version available for you to update. If there is, go ahead and click the button to update WordPress to the latest version.
- Once WordPress has updated itself, the page will reload and show you some information about the new WordPress version. If you see anything else, such as an error message or a blank white screen. You have a problem! First off try re-visiting your WP admin dashboard (your-domain-name/wp-admin) and seeing if the page will reload. If the site will still not reload, you can follow my guide here on how to revert your WordPress version after upgrading. After you have reverted the version, or everything looks good after the update, you can continue to the next step below.
7. Update your WordPress theme
If you are using a premium WordPress theme, you should check to see if an update is available for that theme. If so, you should download and upload that new theme version to WordPress.
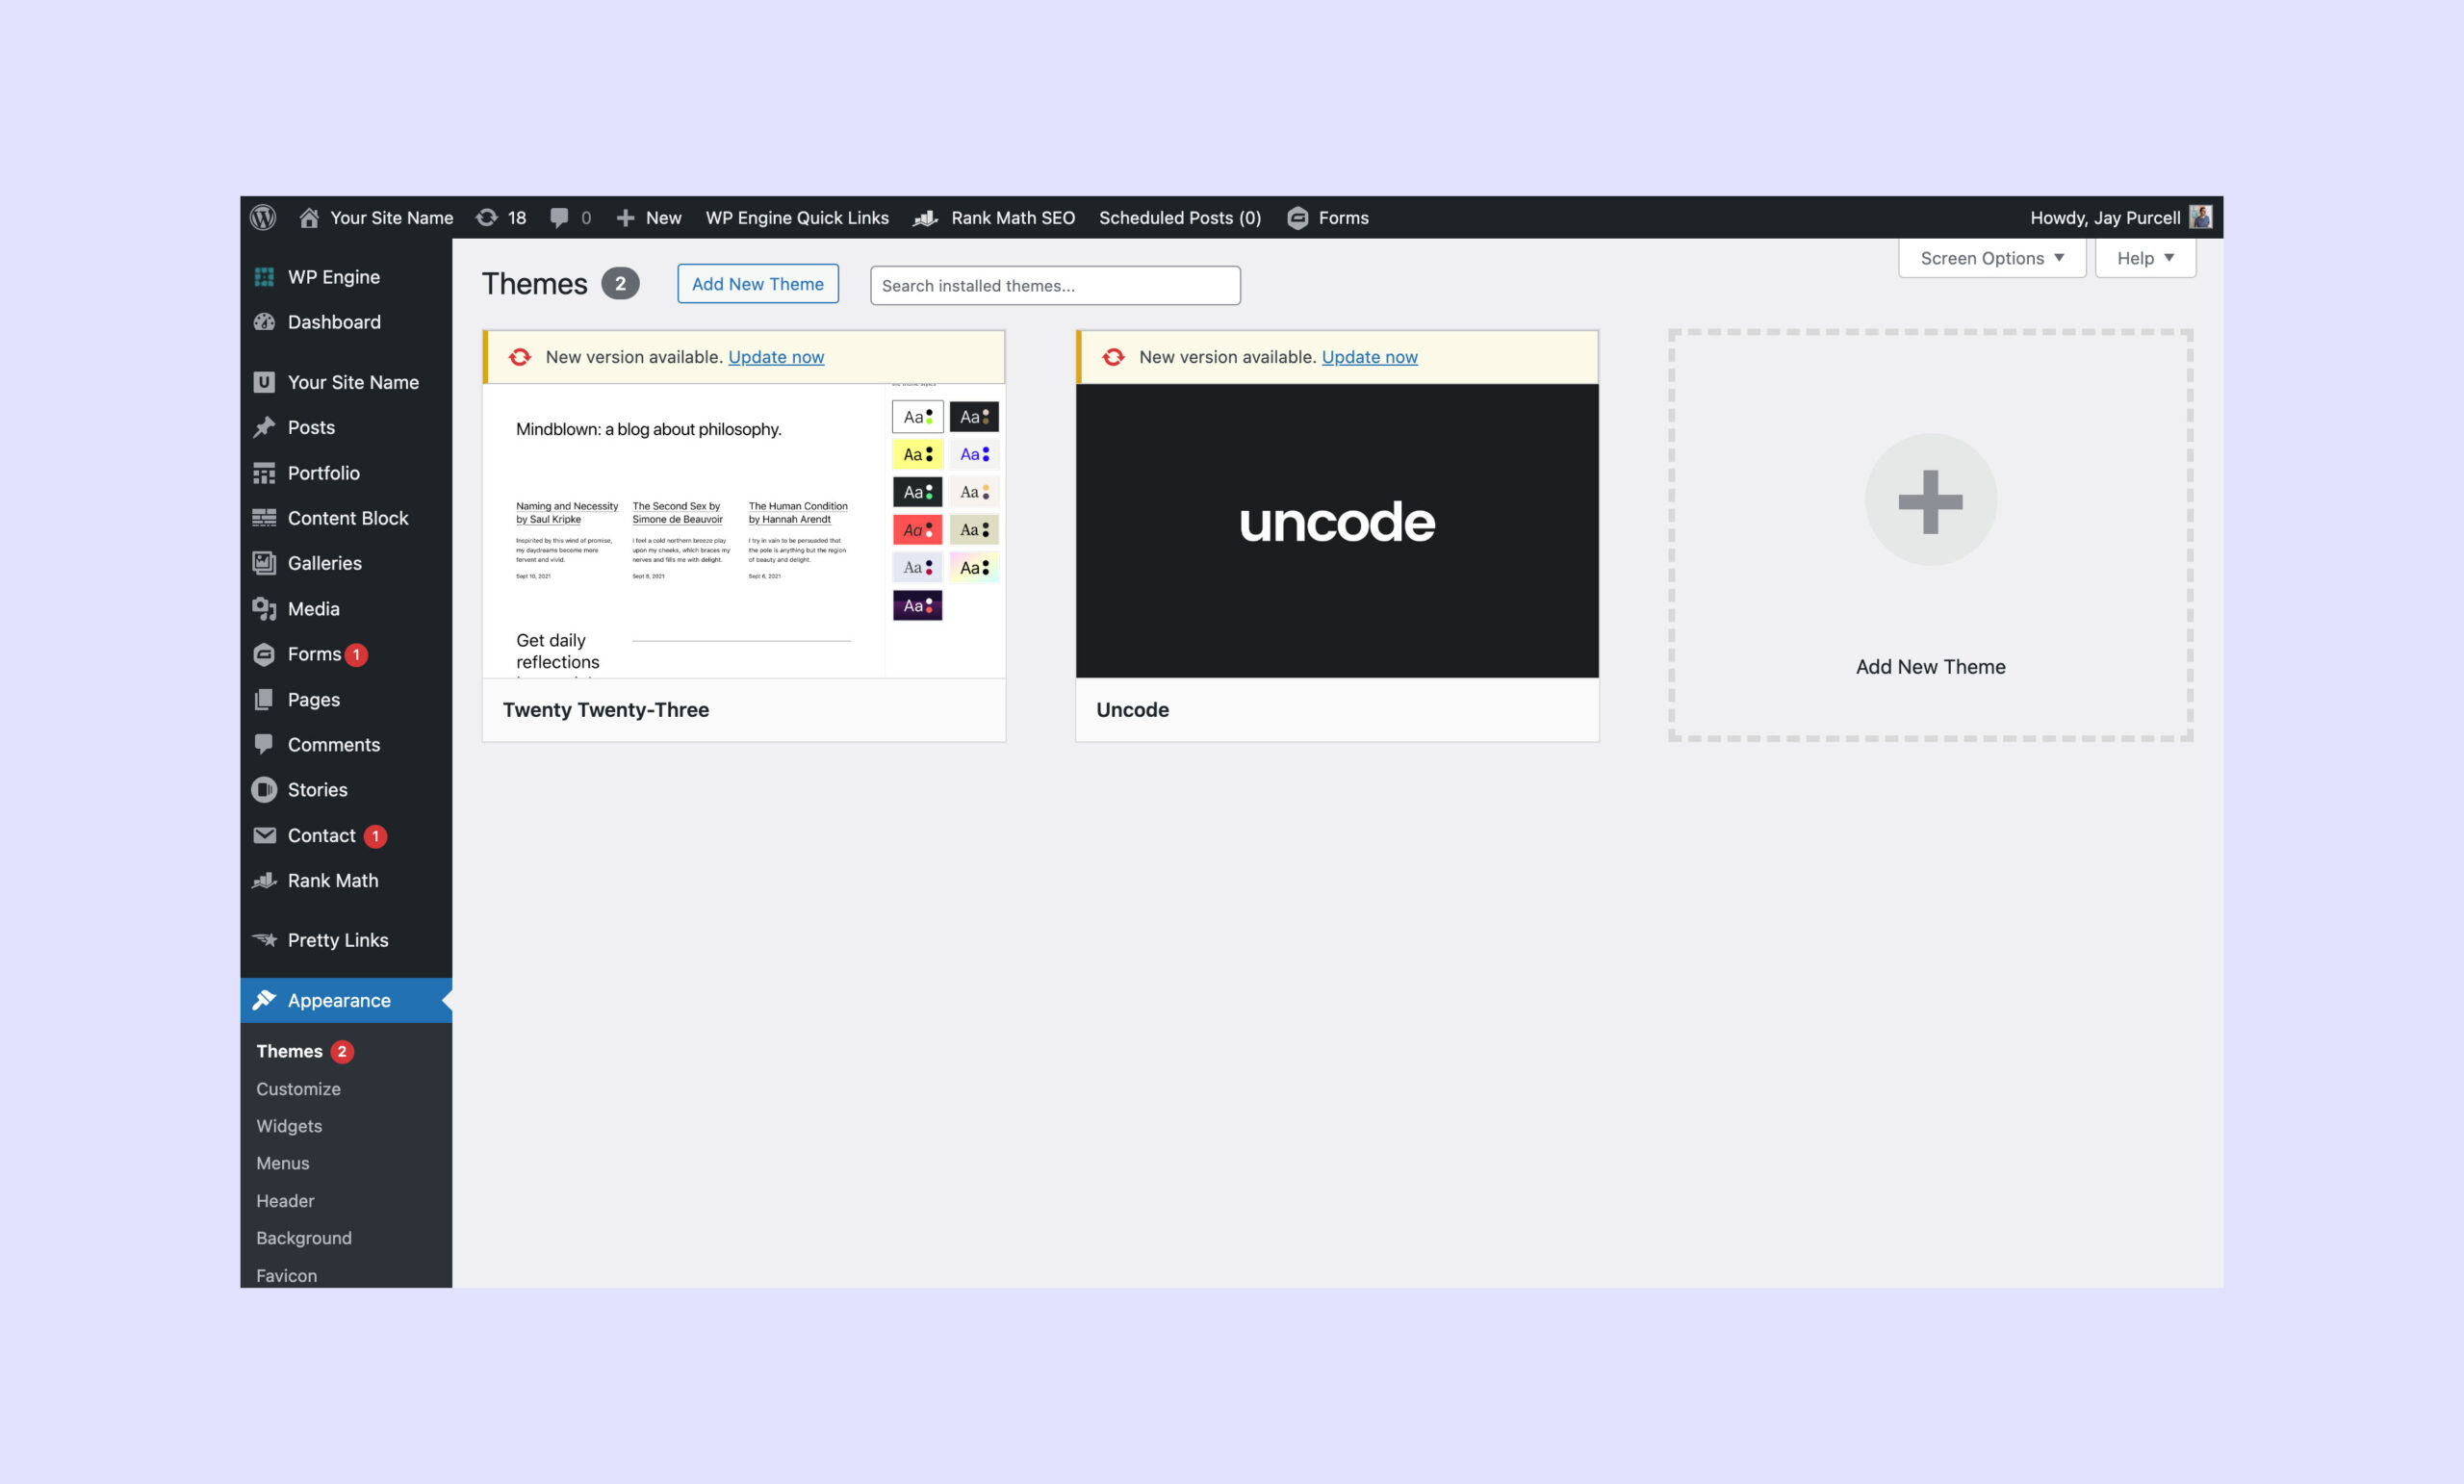
Some WordPress themes will show you if there is an update available. You can see this by visiting the Appearance > Themes page as in the example below. In this case you can just click on the “Update now” link to update the theme.
If you purchased your theme from a specific marketplace such as Theme Forest, you might have to check your account on the marketplace site to see if a new theme version is available.
8. Update each plugin individually
After making sure that you are running the latest version of the core WordPress software, it’s time to start going through and updating each of your plugins.
As mentioned previously in this article, you’ll want to update each plugin individually rather than using the bulk update option. If you use the bulk update option and you end up seeing errors on your website it will be much harder to pinpoint which one of your plugins is causing the problem.
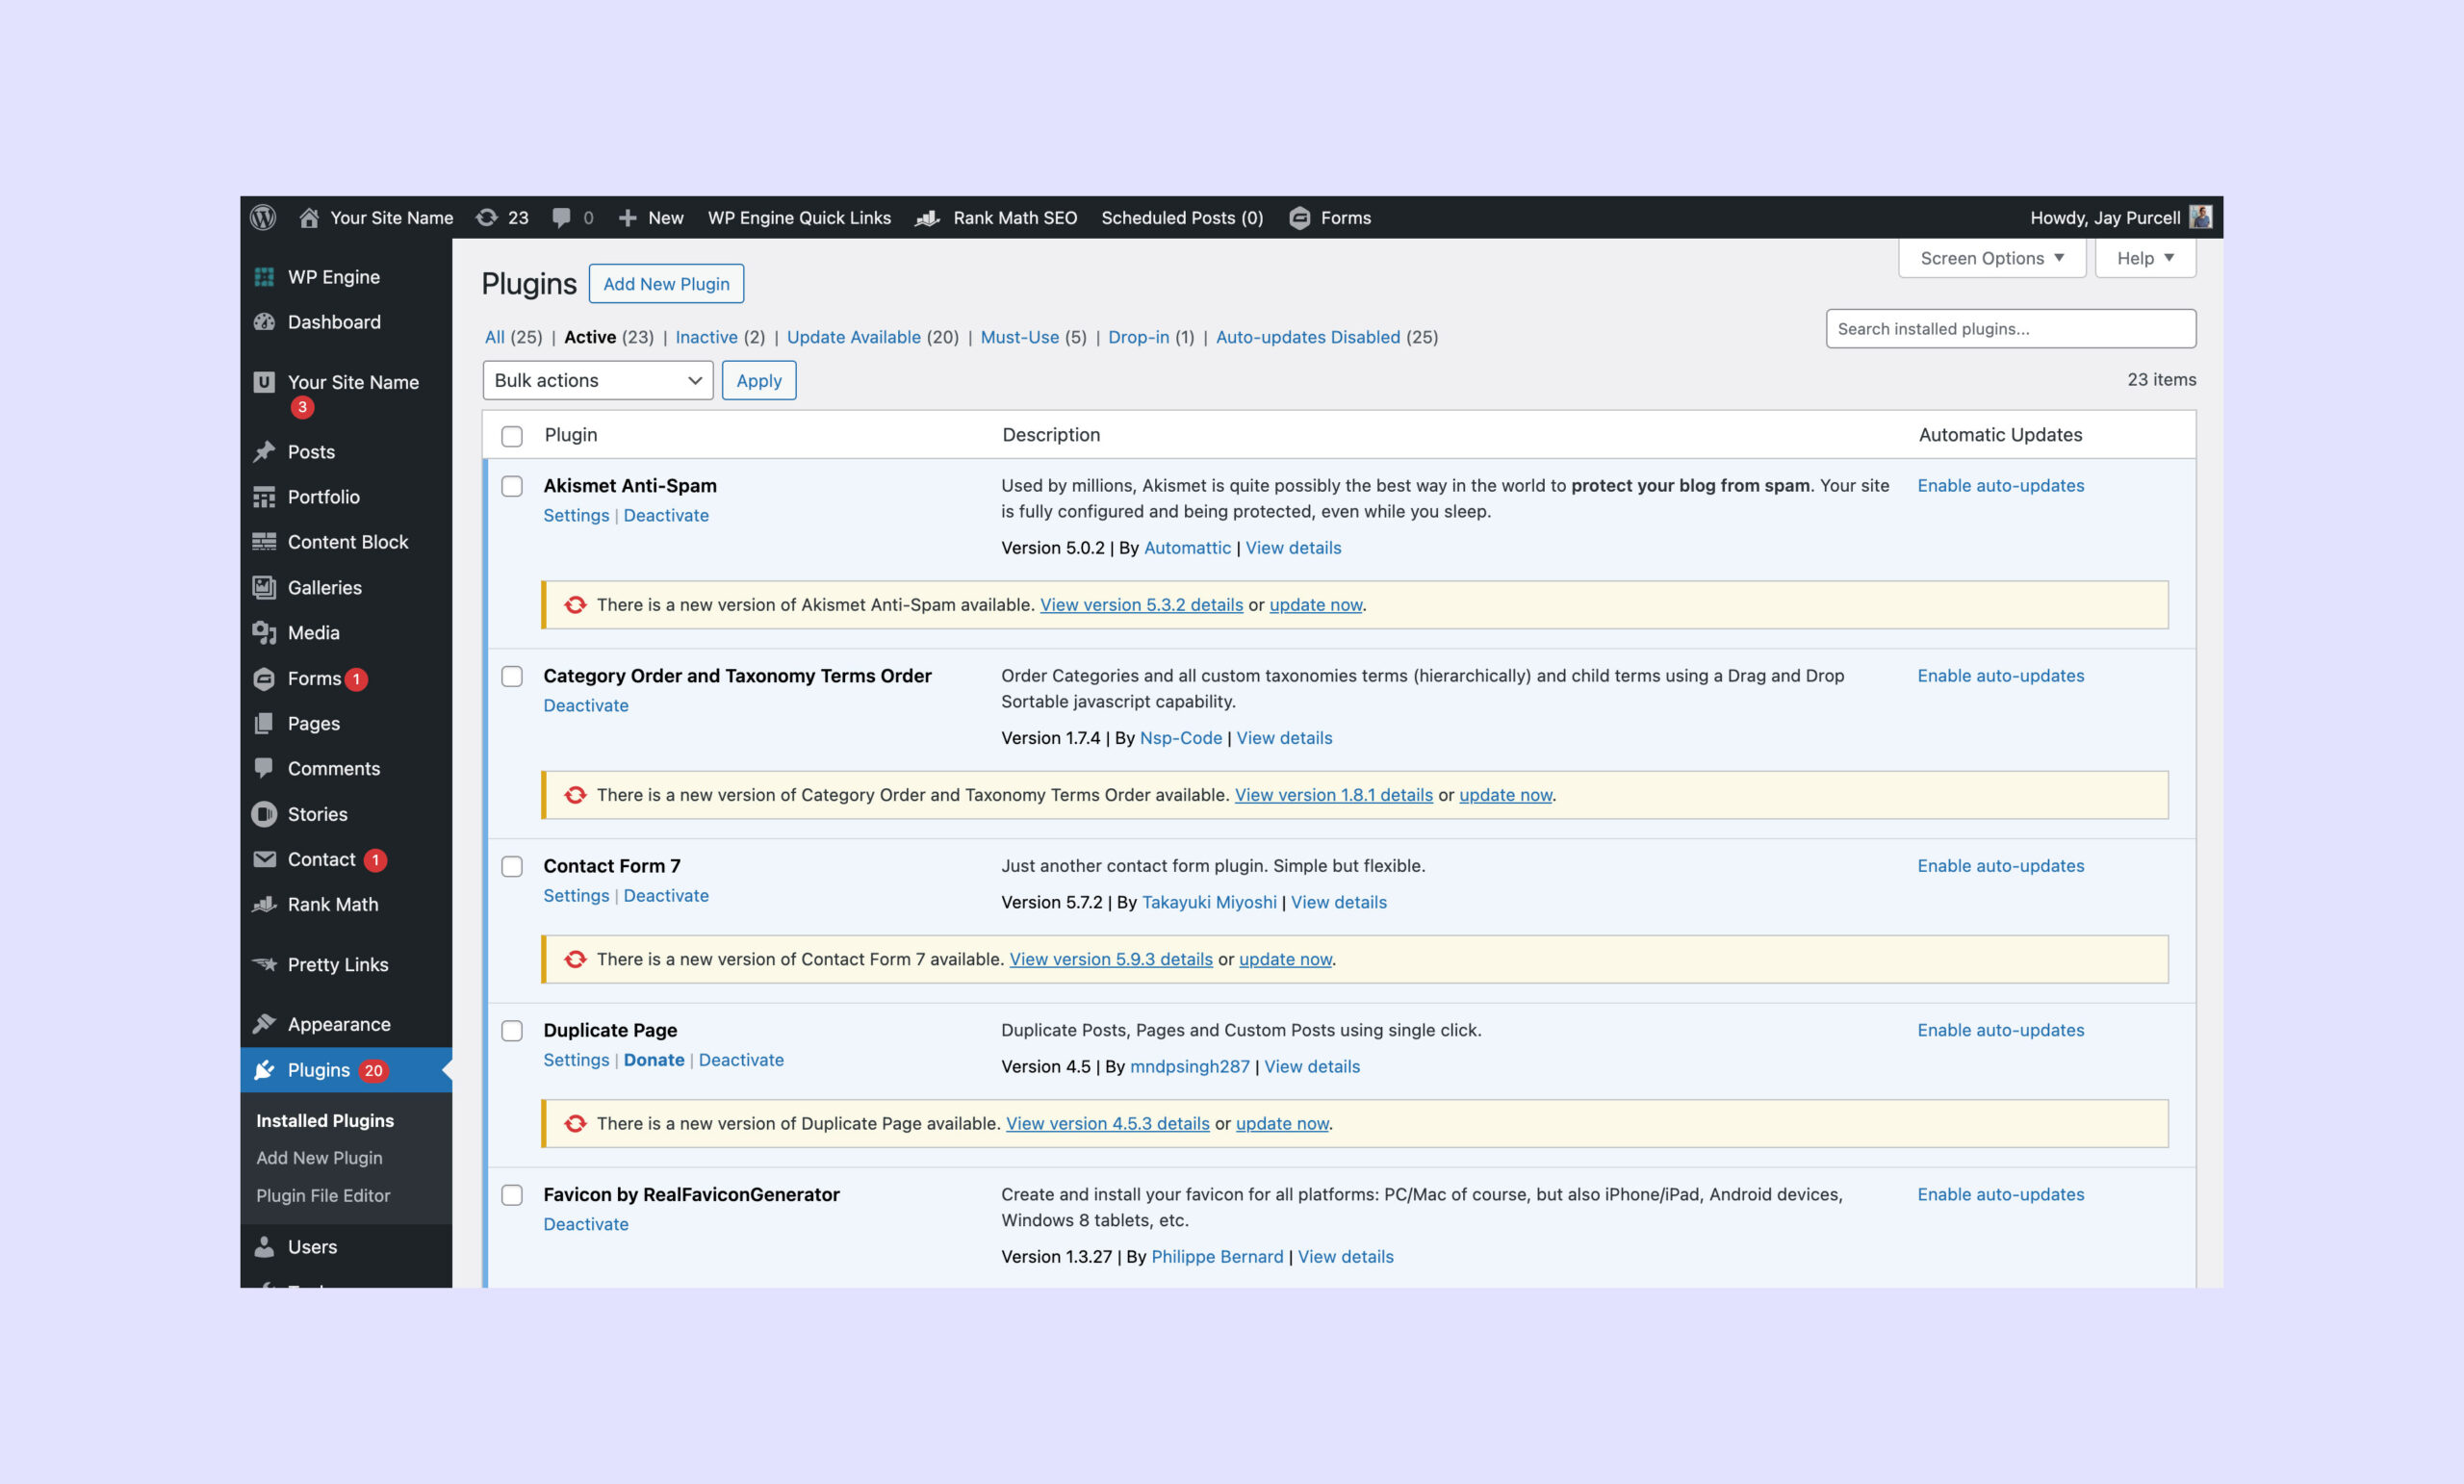
- Go to your plugins page and click on the link that says “Active” at the top of the list of plugins. This will then show you a filtered list of only plugins that are actually activated and in use on your site. If there is an update available for a plugin, WordPress will show a notice under the plugin name and details.
- Go to the first plugin in your list that has an update available and click on the “update now” link. WordPress will then begin the update and the page will reload once the update is complete.
- Once the plugin is updated, I recommend testing the core features of your website before updating any other plugins. If you have written a test plan document, you can refer to that document to run your tests, which should include testing settings menus within WordPress to make sure everything works correctly, including adding, editing, and deleting test content in the “Posts”, “Pages”, “Tags” and “Categories” sections as well as checking the most important front-end pages on your website to ensure they look and function as you expect. Your tests will really depend on the specifics of your site and what you deem to be the most important pages and functions on it.
- If you run into any issues or error messages, write them down in your notes, providing as much detail and context as you can. If the issues you encounter are minor, it’s possible that the issue could go away once you have all your other plugins updated. If the issue is critical however (aka blank white screen, site-down type of thing) then you will probably need to revert the plugin version so you can move forward with your other updates. You can follow my guide here on how to revert a WordPress plugin version.
- Once you have updated that first plugin (or reverted it due to any issues), move on to the next plugin in your list that has an update available. Then repeat all of the steps above until you have gone through your entire active plugin list.
As a side note, it’s possible that not all of your plugins will display that an update is available. This can happen if you purchased a premium theme from a market place like Theme Forest. In this case you’ll need to login to the market place or plugin vendor website to see if they have an updated plugin version available that you can download and upload to WordPress.
Hire A WordPress Developer
Don’t have time to manually keep your WordPress site updated every month?
9. Evaluate your updates
At this stage, you should be running the latest version of WordPress and all your plugins will have been updated to their latest versions. If everything is working as expected, with no errors at all, then congratulations! You can move on to the next step.
If you have encountered any errors or problems or had to revert a plugin version because it did not work, you should hopefully have a detailed list of these issues in your notes. At this stage, I recommend you review those notes to see how you can address these issues. If you are a non-technical person, you may have to hire a WordPress developer to fix these issues. You can also visit the support forum on wordpress.org for each plugin to see if someone else had the same issue as you, or perhaps you can write a new support forum entry to document your problem. If the plugin you are using is a premium plugin, you can also contact that plugin’s support team. The best plugin developers out there will want to know about every error that happens when someone is using their plugin, so if you can inform the plugin developers about an issue, they might just fix it and release an updated version of the plugin, which you can then test updating to.
Sometimes there will be plugins that are just not supported anymore. Aka, the original developers are no longer updating them. These types of plugins can cause problems for your site. In this circumstance, you should evaluate what you are using the plugin for and if there is an alternative out there you can use instead. If the outdated plugin provides something specific that you can’t find elsewhere, you may need to hire a WordPress developer to resolve the issue for you.
10. Delete deactivated plugins
If you have any plugins that are not activated on your site and are no longer in use, I recommend that you delete them. While these plugins may not be active on your site, just the presence of these plugin files on your server could create a potential security threat that hackers could use to compromise your site.
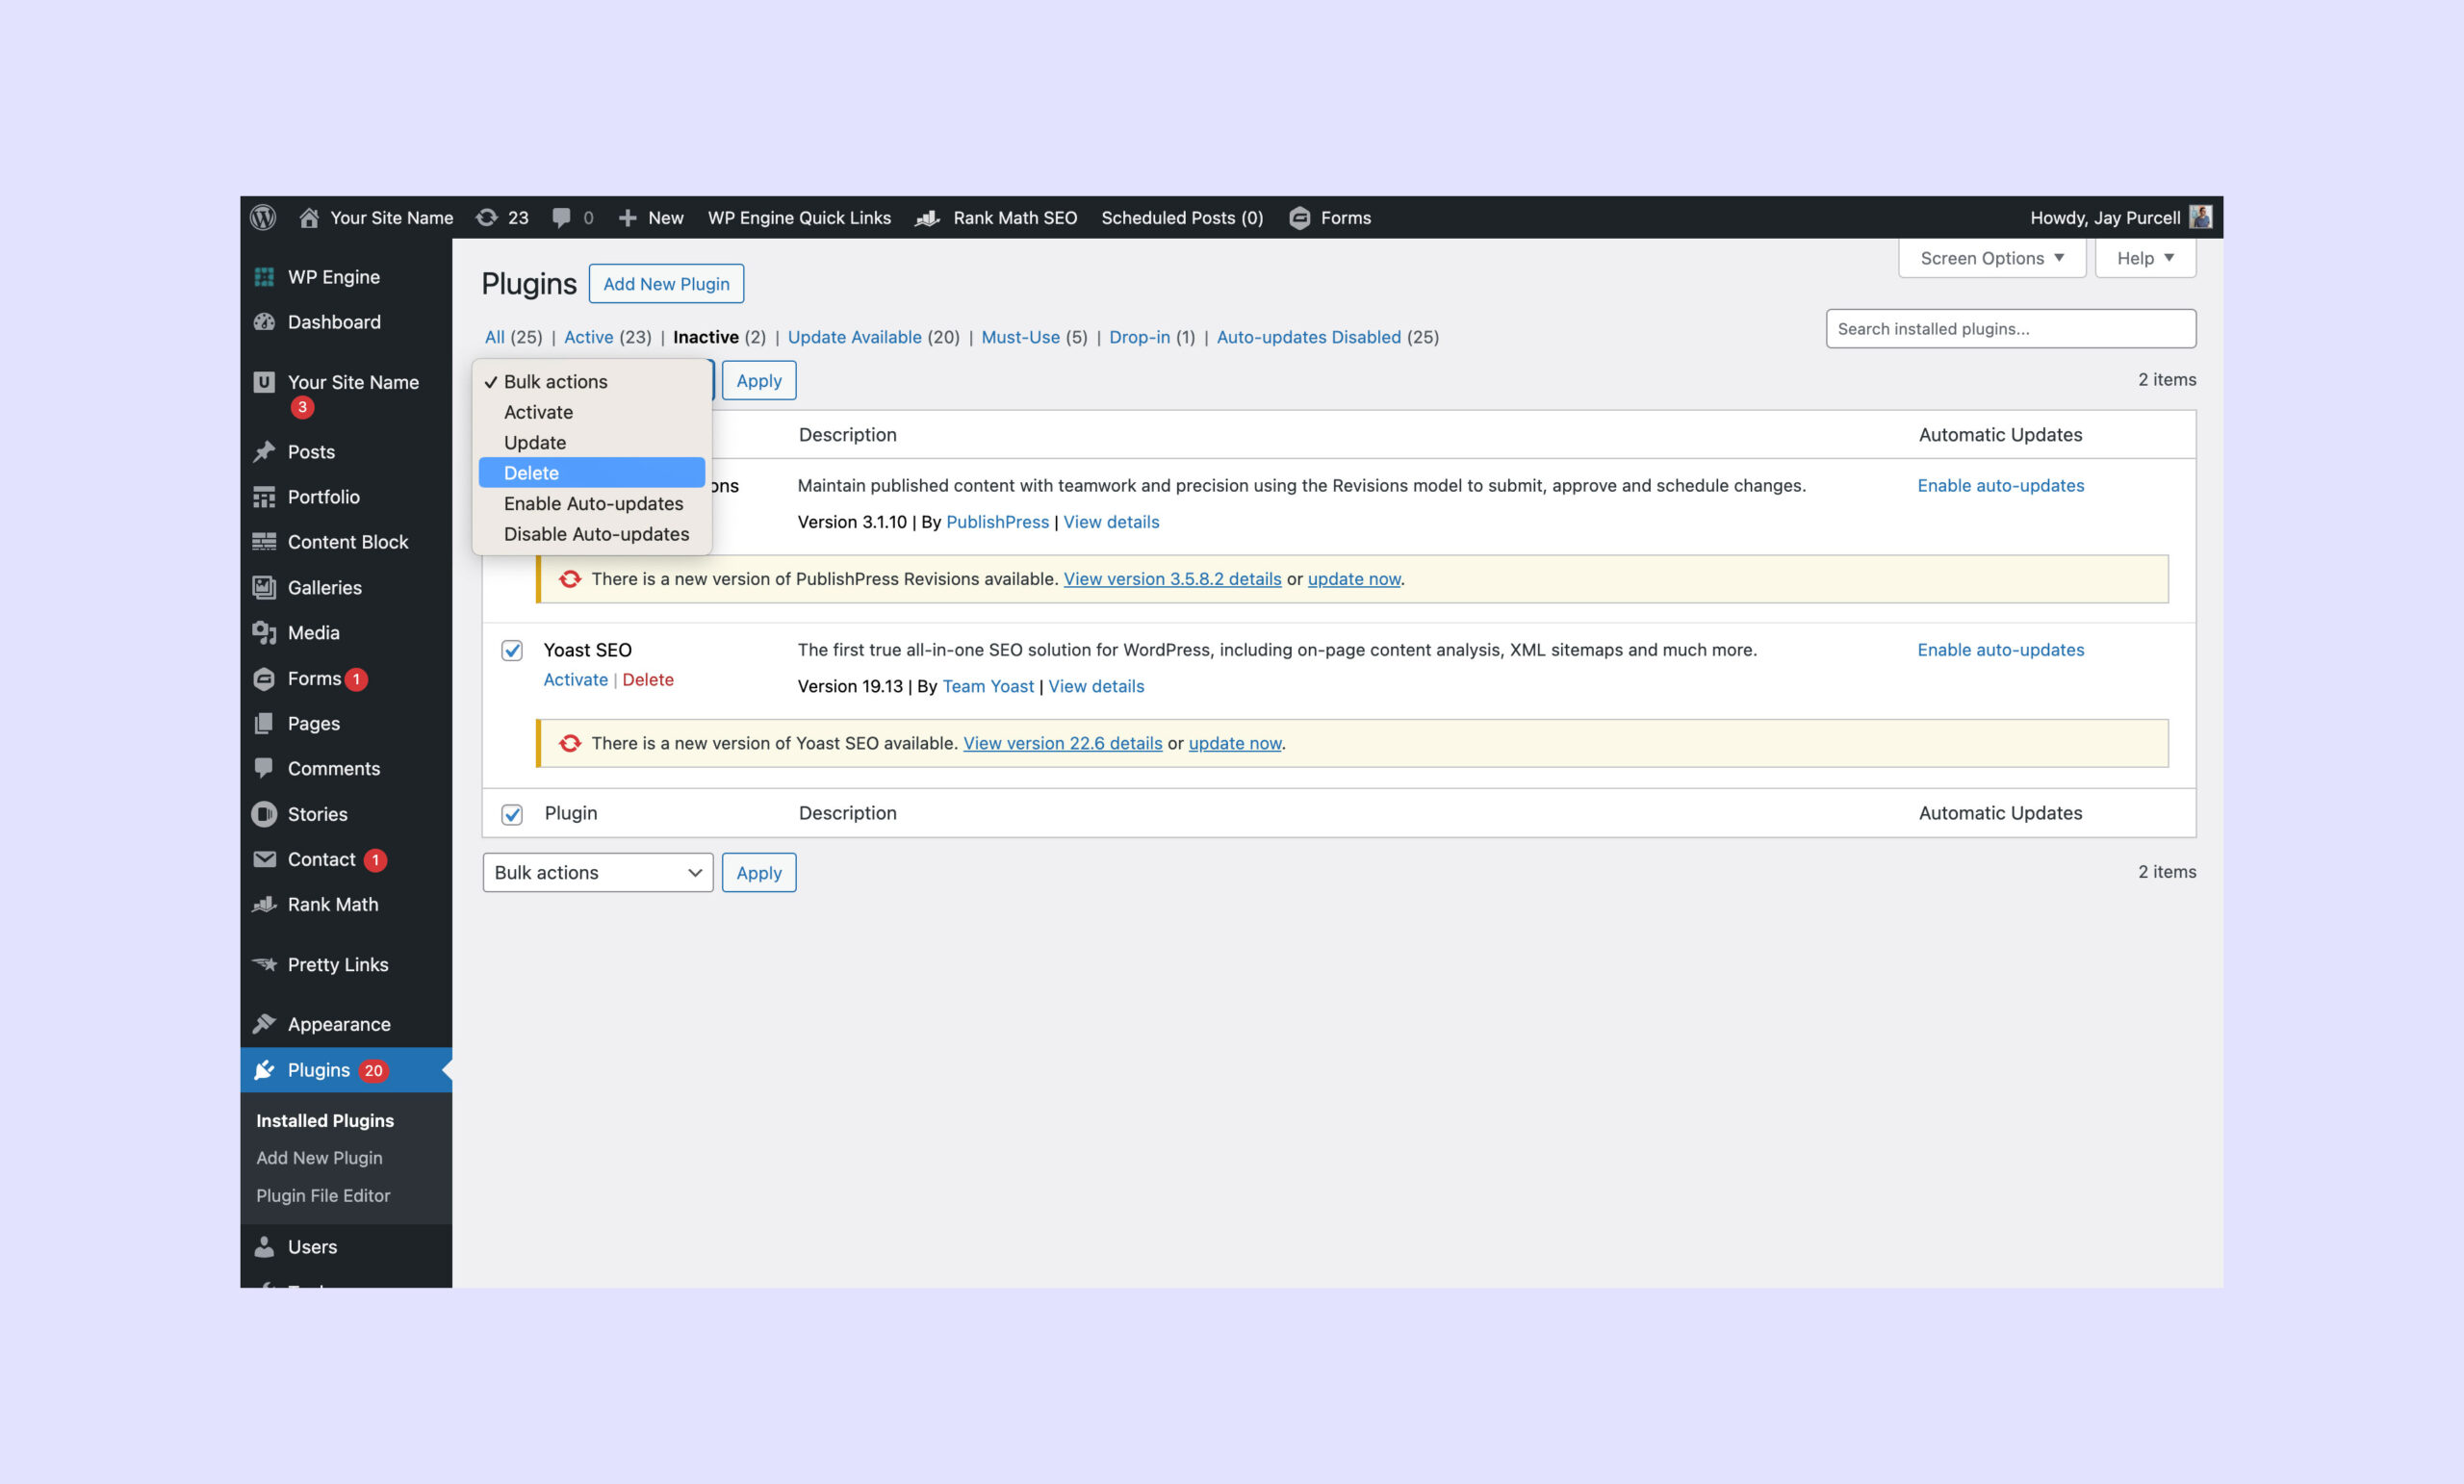
- Go to your “Plugins” page and click on the “Inactive” link at the top of the list of plugins.
- You will now be shown a filtered list of WordPress plugins that are not active on your website. You can now go ahead and select them all using the checkbox, and then use the dropdown menu at the top of the page to select “Delete” and then click the “Apply” button.
- WordPress will now delete those plugin files and the page will reload.
If there is some reason you are keeping a deactivated plugin around, and you don’t want to delete it, then I recommend you at least update its version if one is available. Since you don’t have the plugin activated at this time you don’t need to worry about testing it.
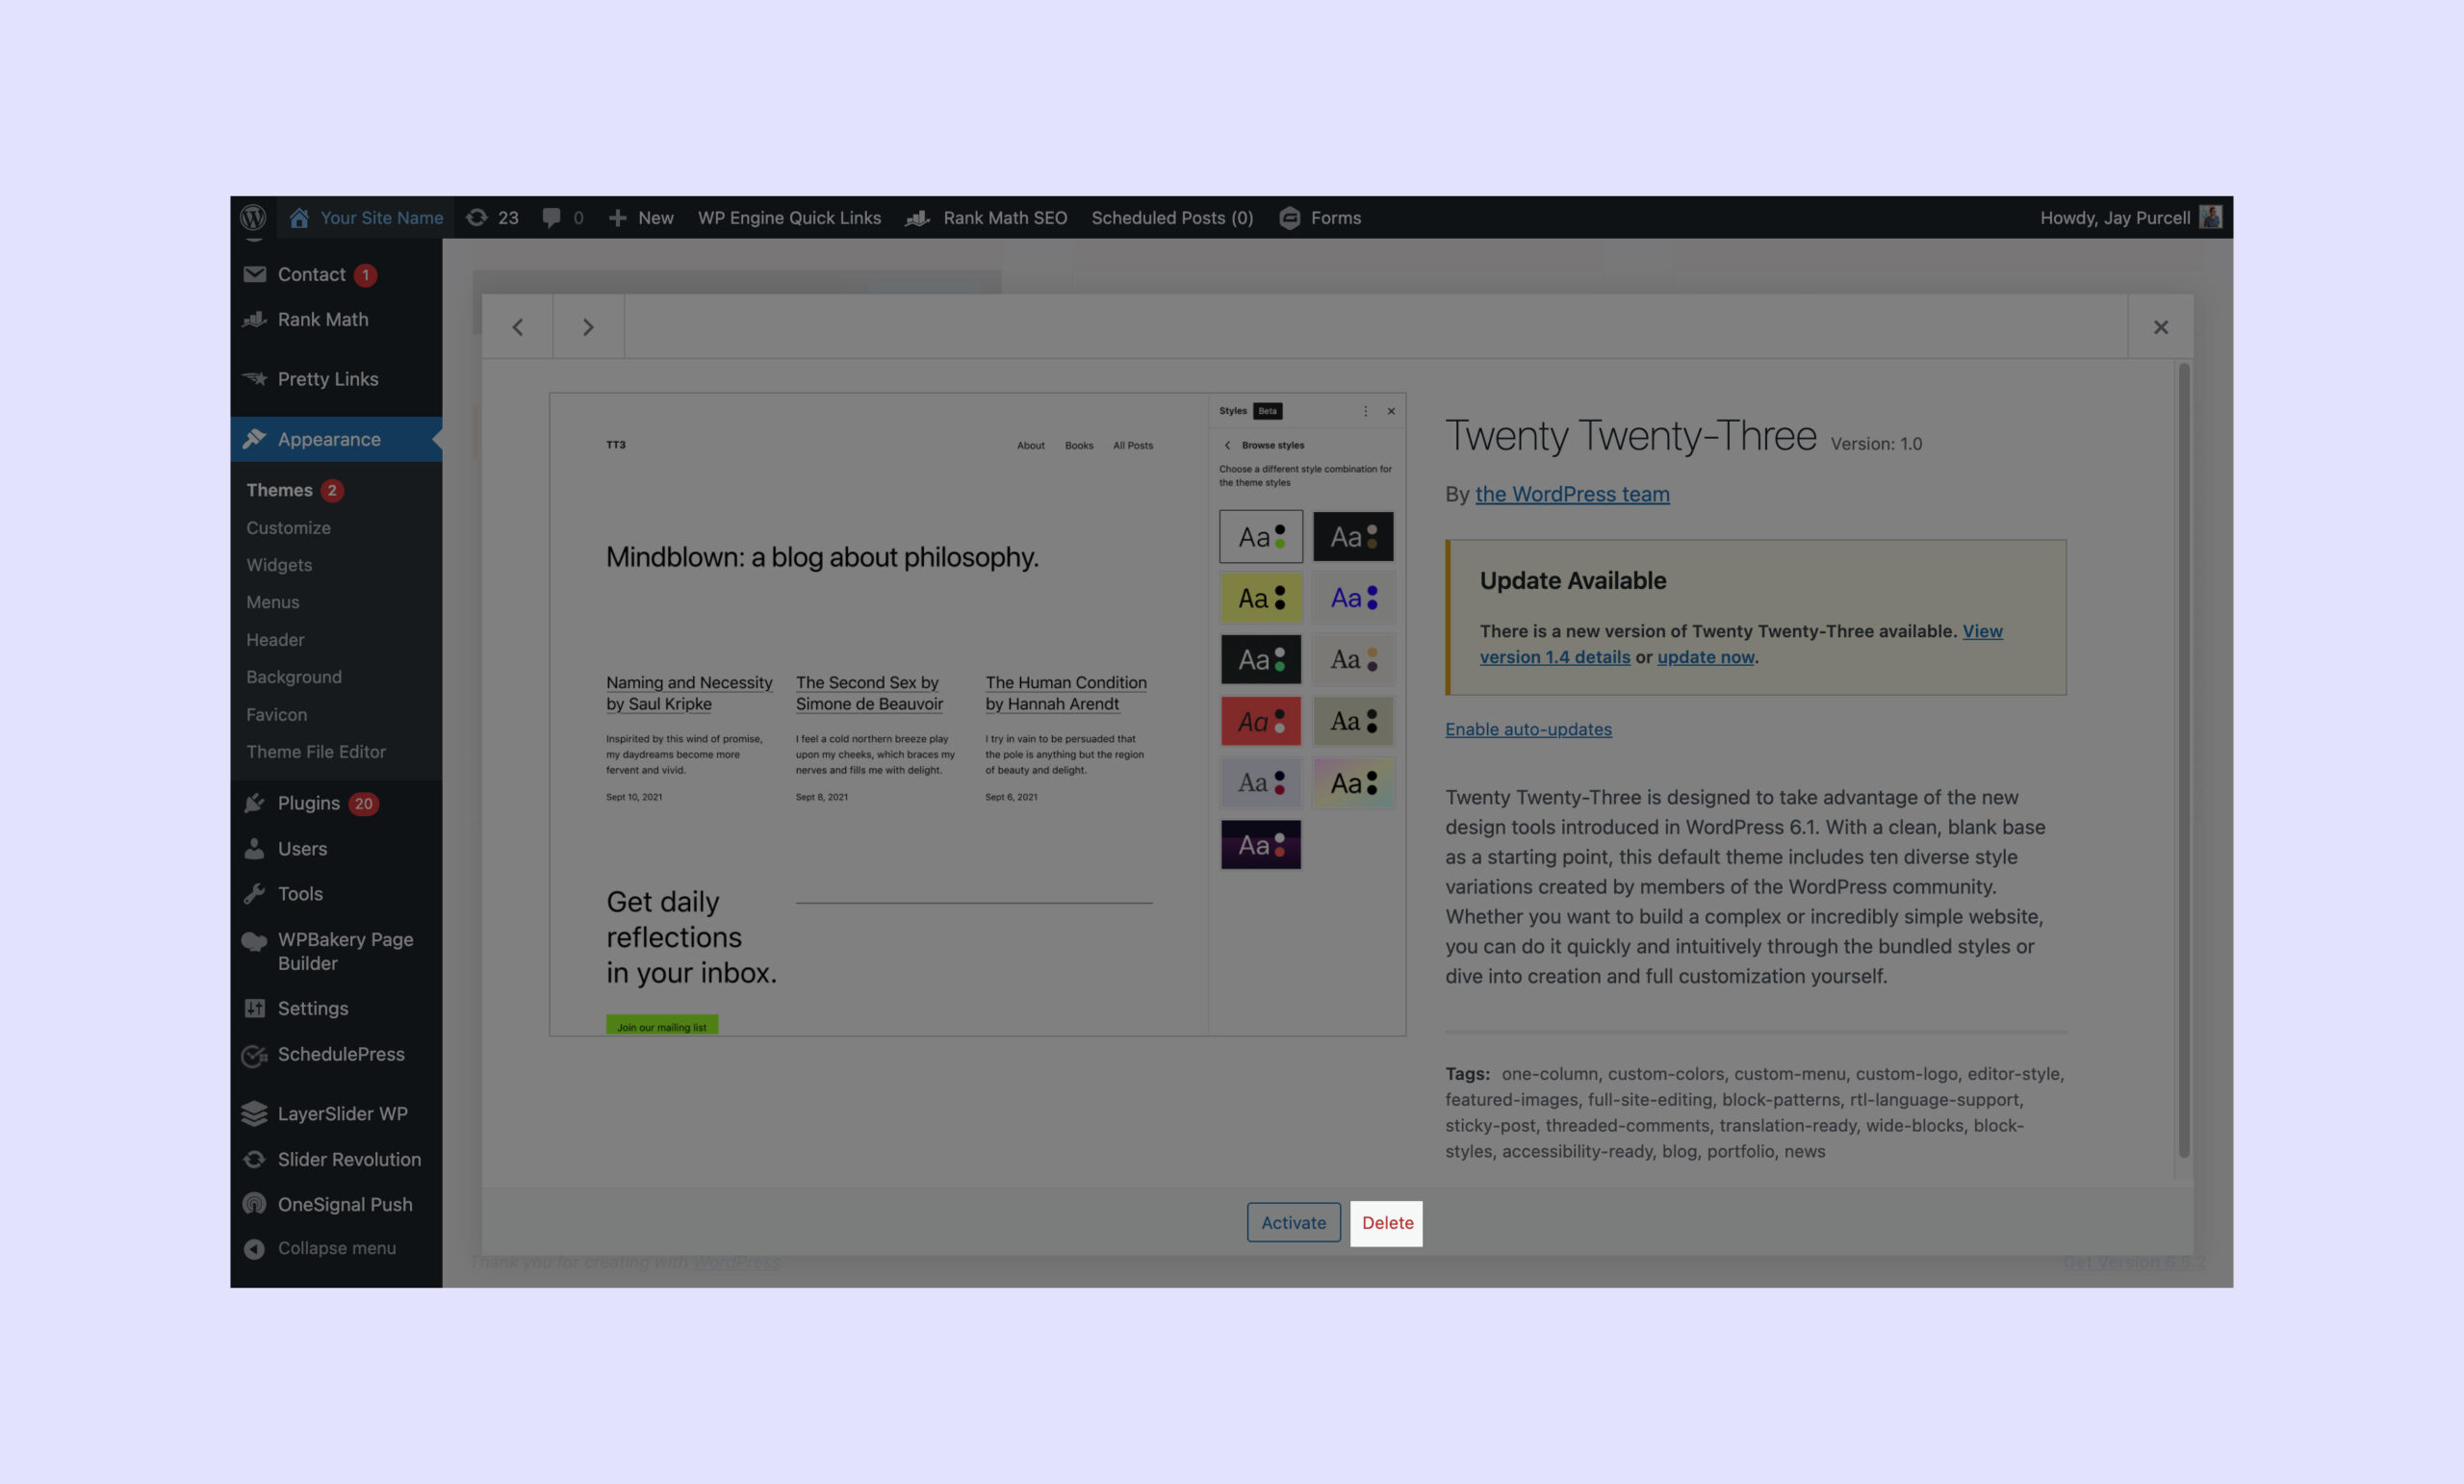
11. Delete deactivated themes
For the same reason as I mentioned about deleting any unused plugins, you should also play it safe and do the same by removing any WordPress themes that you are not using. Be careful here though, if you are using a child theme, you will want to make sure that the parent WordPress theme does not get deleted. WordPress usually prevents this from happening within the dashboard by removing the ability to delete a parent theme. If you are not sure what I am talking about, you can read my guide here on how to create and customize a WordPress child theme.
- In your WordPress menu go to “Appearance > Themes”. This page will show you a selection of all the WordPress themes that are present on your server.
- To delete a WordPress theme you no longer need, click on the theme to open a pop-up window, and then click the “delete” link to remove the theme and all of its files from your server. If you do not see the “delete” link, that is ok. This will either be the current theme you have active on the site or the parent theme for your site.
If there is some reason you do not want to delete these other themes, then you should run an update on them if the theme developer has released a new version. A notice will appear on the theme thumbnail if an update is available for it.
I should also note that not of all your themes will display if an update is available or not. This can happen if you purchased a theme from a market place like Theme Forest. In this case you will need to check the theme developer’s website or marketplace listing to see if a new version is available.
12. Backup your live/production WordPress website
Now that you have everything updated on your WordPress installation, you can go ahead and run these updates on your live/production website.
If you are using a managed hosting provider such as WP Engine, this process is very quick. They have a feature that will allow you to backup your live/production website and then you can just copy your staging site to your live site. So basically a few clicks and you are done.
If you don’t have a hosting provider that allows for that functionality, you’ll have to manually back up your WordPress site and then run through the update processes again on your live site. If anything goes wrong with your updates, you can revert the site to the backup you made.
For more information, you can read my guide here on how to back up a WordPress website.
13. Run through all updates on your live/production site
The following only applies if you don’t have the ability to copy your staging site to your live/production site, or if you are uncomfortable with that approach.
Once you have backed up your live/production website, you can go ahead and run through the WordPress version update and then update each plugin individually.
To be safe during this process, I recommend that you follow the same steps as you did on your staging site, by going through your test document after each update you make. You’ll also want to refer to the notes you made if you encountered any errors, so you can avoid updating any plugins that triggered any errors or problems with your site.
Once you have completed this step, your WordPress installation will be fully up to date and hopefully, you won’t have too many other follow-up issues that need to be fixed by a developer or a plugin vendor.
If you want to go the extra mile on your WordPress site maintenance, I have provided a few more steps below that will assist with the overall health of your website.
14. Find and fix broken links and images
If you have a lot of content on your website, especially older content, there will come a time when some links and images will get broken. This could be because you linked to a page (internally or externally) that is no longer live, you deleted an image from your media library, or you embedded an image in an article that was hosted elsewhere. In all of these cases, it’s best to find and resolve these issues to make for a better experience for your users, as well as to keep the search engines happy.
There are several ways to do this, so I have put together a separate guide on how to find and fix broken links and images on your WordPress website.
The good news is, you probably won’t have to do this that often. These issues mostly affect older content, but I would still recommend doing this audit 2 to 3 times a year.
15. Run an accessibility test
No matter the size of your website, or who your target audience might be, I believe it’s best to always make your website as accessible to everyone as possible. And for some larger organizations, this is not just an option, but an actual legal obligation.
As your site grows, you should also run regular accessibility audits on your site. There are several methods and ways of doing this, so I have put together a more detailed guide on how to make your WordPress website accessible.
16. Run a technical SEO test
Whether you depend on traffic from search engines or not, I feel it’s always best to have your brand, content, and website presented in the best way, and for your information to be easily accessible no matter which platform you appear on. And search is a platform.
Technical SEO just means that all the content on your web pages are marked up with code in the correct way so that search engines can better understand the structure of the content on your pages. By fully addressing this aspect of your web pages, you’ll not only make it easier for search engines to index your content, but you’ll also be able to have a bit more control over how these search engines present your content.
There are clear guidelines on what the best practices are for technical SEO, so they are easy to follow. Depending on the complexity of your website, however, you may need to hire a developer to implement some of these features, or to introduce a system that will make sure all your authors create content that adheres to technical SEO best practices.
17. Run a site speed test
Site speed is also another important factor for both your user experience and search engine optimization. Besides that, you’ll also want to be aware of any features or functions that might be slowing down or blocking core functions on your website.
To run a site speed test I recommend using the Lighthouse extension for Google Chrome.
18. A note about PHP updates
For those non web developers of you out there, PHP is the programming language that the WordPress software is built on, and from time to time the creators of the PHP language will release new versions. The creators of WordPress, and WordPress plugins, will also be making sure that their code runs smoothly on the latest version of PHP.
Without getting much more technical, every web server needs to have a version of PHP installed to run the WordPress software, and it’s that version that needs an update from time to time.
Managed hosting platforms like WP Engine, Hostinger, or WordPress VIP, will all let you know when this needs to happen and usually provide you with just a couple of easy steps to update to the latest version.
Before you go live on your site with the latest version of PHP, I definitely recommend that you thoroughly test it. All you have to do is update your staging site to the latest version of PHP before you run through the WordPress and plugin version updates as I have outlined in this article. If all goes according to plan, then you can safely update PHP on your live/production website as well.
If you are not using a managed WordPress hosting provider, then I’m guessing you are familiar with how to manage PHP on your server, or you have a developer who is.
19. A note about managed WordPress hosting providers
Finally, I want to praise the emergence of managed WordPress hosting providers. These companies manage the whole process of installing and managing WordPress on your server and optimizing the server to perform the best it can, specifically for WordPress.
Back in the day a lot of us private WordPress users had to purchase basic web hosting and install various software on the server in addition to WordPress. This made the whole process of maintaining and updating our WordPress sites very cumbersome. So I would say in 2024 if you have a private WordPress site and you are not hosting on a managed provider, you really need to change that now. The tools they provide for creating test sites, backups updates, etc are the best in class.
Due to each WordPress website being unique from the next, these managed hosting providers can not test every one of your plugins and WordPress versions to make sure that you’re site functions correctly, which is why this manual update process (and this entire guide I have put together) exists, and why these hosting providers have provided the tools for you to test and debug your site.
If you are looking to move your site to a different hosting provider, you might want to consider subscribing to On Press or booking a call with me.
In Summary
As promised, this is my very detailed guide on how to maintain and update your private WordPress website in 2024.
If you have any questions about this guide feel free to leave a comment below or book a call with me.
Leave a Reply